Post by Frances on Jan 8, 2015 0:57:37 GMT
I have moved up from “Foot Notes” (slipper lasts) to “Head Notes”
Since I am going back to my other home in Cumming, Georgia USA in a few days, I have packed all my felting supplies. Nada’s post in “Daily Dose” regarding the beret she made reminded me that I had wanted to research the making of a hat mould/block. The plastic jar example confused me.
I found several different ways of making hat blocks. None specifically discussed head size. After thinking about it the only size that is really needed is the circumference of the head where the hat will sit as many hats are taller than the crown of the head. If the hat is to fit the crown of the head then another measurement would be needed.
Following are four ways that I found to make a hat block -
1. Take several pieces of Styrofoam and glue them together in the approximate size of the finished hat block. Then use a knife to carve the shape. Not a chance I would do this – to save money on a project when making Topiaries my friend purchased square blocks of flora foam because they were much cheaper and we shaped them into balls. What a mess!!!
Pros: Free if Styrofoam blocks used as packing were used to make the form
Cons: Messy and hard to get correct shape and size
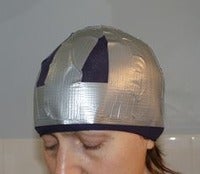
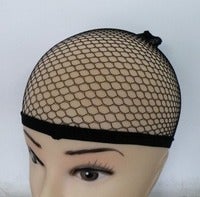
2. This was interesting especially if making a cloche. Put a stocking on your head or a snoop/wig cap and then wrap your head in duct tape. I would put a plastic bag or shower cap on my head first because I certainly do not want duct tape stuck to my hair. :oOuch! This would need to be stuffed with something or use expandable foam to fill the form (explained in video below). In the pictures the form was made to use as a pattern and then cut apart. The hat was sewn together out of boiled wool.
Pros: Get an exact head size- could be useful if making a hat for someone else as they could send the pattern to you.
Cons: Should remember to factor in the thickness of hair since it will be smashed down under the stocking.
Head Wrap Head Wrap
Snoop Completed hat
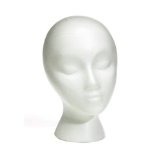
3. Styrofoam wig stand – many different styles available from $3 to $40 – no circumference given in the specifications.
Pros: Easily attainable
Cons: May not be the correct size – wonder if a man’s head would be larger than a woman’s
Wig Stand
Continued in next post - reached max of 5 photos
Since I am going back to my other home in Cumming, Georgia USA in a few days, I have packed all my felting supplies. Nada’s post in “Daily Dose” regarding the beret she made reminded me that I had wanted to research the making of a hat mould/block. The plastic jar example confused me.
I found several different ways of making hat blocks. None specifically discussed head size. After thinking about it the only size that is really needed is the circumference of the head where the hat will sit as many hats are taller than the crown of the head. If the hat is to fit the crown of the head then another measurement would be needed.
Following are four ways that I found to make a hat block -
1. Take several pieces of Styrofoam and glue them together in the approximate size of the finished hat block. Then use a knife to carve the shape. Not a chance I would do this – to save money on a project when making Topiaries my friend purchased square blocks of flora foam because they were much cheaper and we shaped them into balls. What a mess!!!

Pros: Free if Styrofoam blocks used as packing were used to make the form
Cons: Messy and hard to get correct shape and size
2. This was interesting especially if making a cloche. Put a stocking on your head or a snoop/wig cap and then wrap your head in duct tape. I would put a plastic bag or shower cap on my head first because I certainly do not want duct tape stuck to my hair. :oOuch! This would need to be stuffed with something or use expandable foam to fill the form (explained in video below). In the pictures the form was made to use as a pattern and then cut apart. The hat was sewn together out of boiled wool.
Pros: Get an exact head size- could be useful if making a hat for someone else as they could send the pattern to you.
Cons: Should remember to factor in the thickness of hair since it will be smashed down under the stocking.
Head Wrap
 Head Wrap
Snoop
 Completed hat
3. Styrofoam wig stand – many different styles available from $3 to $40 – no circumference given in the specifications.
Pros: Easily attainable
Cons: May not be the correct size – wonder if a man’s head would be larger than a woman’s
Wig Stand

Continued in next post - reached max of 5 photos


 (it grew!!)


