|
|
Post by halay on Jan 19, 2016 16:18:27 GMT
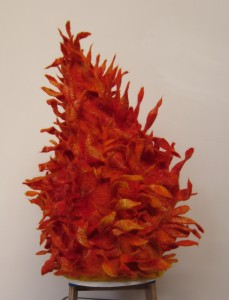
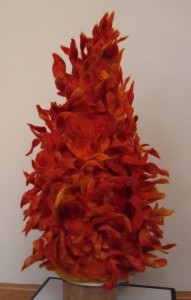
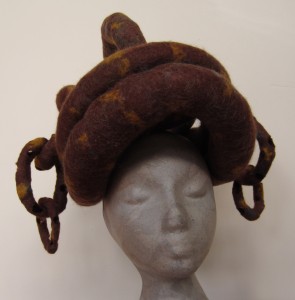
Teri, your chain hat looks very intriguing. I wonder what it will look like when finished. Also, the other, flame one, looks very interesting. Can't wait to see it on you or on manequin.
|
|
|
|
Post by Frances on Jan 19, 2016 16:35:24 GMT
|
|
|
|
Post by elizabeth on Jan 19, 2016 18:37:56 GMT
Hooray, Cathy!! Cats are worse critics than relatives, eh? They steal the nastiest scrap to play with but refuse the lovely felted mousie you made for them.
I'm sure they'll explore it eventually, especially with some nice treats (and 'nip?) If not then I'm sure it will be a nice cat-butt warmer.
Put a paper bag in it. Or put it IN a box!!
|
|
|
|
Post by Teri Berry on Jan 19, 2016 19:57:17 GMT
Well done Cathy, it looks great, I wonder if they think think the hole is too low, can you rotate it to make it higher?
Frances, that looks like the right stuff, just be careful what you buy is not intended to go through a foiling machine (I think they are meant for paper foiling). The textile ones are foil with a clear plastic backing, you put glue on your fabric then iron your foil on, foil comes away leaving just the clear plastic.
|
|
|
|
Post by Teri Berry on Jan 19, 2016 21:19:05 GMT
|
|
|
|
Post by Frances on Jan 19, 2016 22:08:19 GMT
Well done Cathy, it looks great, I wonder if they think think the hole is too low, can you rotate it to make it higher? Frances, that looks like the right stuff, just be careful what you buy is not intended to go through a foiling machine (I think they are meant for paper foiling). The textile ones are foil with a clear plastic backing, you put glue on your fabric then iron your foil on, foil comes away leaving just the clear plastic. Did you explain that correctly I thought the foil would be left as an embellishment and the clear plastic would be gone. I guess I do not understand the process.  |
|
|
|
Post by lyn on Jan 19, 2016 22:19:24 GMT
Cathy - once you entice them inside with a few treats they'll realise what a cosy cave you've made for them!
Teri - The flame hat is divine and I'm looking forward to seeing it with some foil. The chain hat is a stunning design and very cleverly crafted!
|
|
|
|
Post by Pandagirl on Jan 19, 2016 22:23:07 GMT
Teri, the hats are great. The flame hat will really look good with the foil. Did the chain hat come out as you envisioned? It's certainly different. :-0
|
|
|
|
Post by elizabeth on Jan 19, 2016 22:32:50 GMT
AMAZING!! Teri, the flame hat is fabulous.
I'm still thinking about the chain hat. It looks very African.
|
|
|
|
Post by MTRuth on Jan 19, 2016 22:40:44 GMT
Cool hats Teri!
Frances, the plastic comes away from the fabric leaving the foil behind.
|
|
|
|
Post by Teri Berry on Jan 19, 2016 23:19:21 GMT
Thanks Ruth, that is what I was trying to say  Thanks everyone, the Chain hat isn't entirely what I had in mind - the highest ring stands much higher than I had pictured and the "head rings" didn't shrink as much as I expected, but I do like the way the smaller links dangle and move. I'll put it aside for a few weeks and then decide what to do with it, if nothing else I'm sure I can give it away at a music festival, festival-goers can't seem to get enough of "whacky" hats |
|
|
|
Post by luvswool and dyestuff on Jan 19, 2016 23:21:22 GMT
Thanks all for the cat cave comments and suggestions. I do have cat treats on hand, as well as catnip. Both worth a try! I made the hole low for their convenience.
Well, shifting it now for their pleasure.
The flame hat is fantastic! I am still thinking about the chains…so unusual and I am guessing very difficult to make.
|
|
|
|
Post by Frances on Jan 20, 2016 2:05:05 GMT
Terri I can see the ring had on an African or dark skinned woman with her hair pulled back - think it would be very striking. The flame hat is awesome would like to try that technique (all the loose pieces) on a shawl.
|
|
mwes
Full Member

Posts: 79
|
Post by mwes on Jan 20, 2016 5:25:54 GMT
Hi, I am kind of new to this forum but I have enjoyed the community immensely so far. I have been wet felting since around October and am still quite new to the process but now have been working my way through the beautiful tutorials by rosiepink. So here is my challenge: I decided to try and combine the pod making with their tutorial about felting a flower picture. I have never tried incorporating chiffon and so experimented with that as well as lace, silk, and tutu netting. Here is the process so far  .    1) Most of the flower heads (and wool yarn) didn't felt into the pod. I tried to remedy it so far by trying to needle felt them in. I did use bubble wrap for most of the felting instead of tutu net so maybe that's why? 2) I can't figure out how to avoid wrinkling.  I did start panicking when the flowers wouldn't felt so I did use really hot water during part of the felting process after I removed the resist. Anyone have suggestions? 3) My favorite part so far is the bottom of the pod (but no one can see that part).  4) Most of all, in the tutorial all the flowers look so clean and bright but my flowers have hairy blue things all over them that make them look dirty. I tried shaving them but they still look dirty. Do you think I should try to felt/full way less next time, use a lighter background color, or make thicker prefelt??? I do tend to overfelt decorative objects. I would appreciate your advice! Attachments:
|
|
|
|
Post by lyn on Jan 20, 2016 11:25:01 GMT
What a beautiful pod! I very much like the way you achieved the coloured rim and the decoration inside. The outside is so pretty. When there are a lot of 'attachments' it can sometimes be better to use netting during the rolling - this is something that has to be decided by the felter using her experience as a guide. If the embellishments are more or less attached then needle felting is a good fix. You might consider hand stitching/embroidery to those bits that need a little help and that would also embellish the pod further. There will be 'texture/wrinkles' on handmade felt. The rule of thumb is that felt made slowly and gently with tepid water will be smoother than felt made quickly and roughly with hot water. Where possible, lay thick pre-felts onto a background that has been pre-felted to the same degree to reduce wrinkling. If you put thick pre-felts onto loose fibres, then during felting the loose fibres will shrink more than the pre-felts and produce wrinkles around the pre-felts. As for migration of fibres (the blue running up through the flowers), it's tricky as the pod does have to be fulled to the max if you want it to be firm standing. 'The Meadow' is not fulled to the max. A felted picture doesn't have to be fulled completely - it just needs to be fulled enough for the purpose the felter has in mind. It may be useful to make some samples. Make a piece of pre-felt then cut a strip off and put it to one side. Continue rolling the rest of the pre-felt then cut another strip off. Make about four strips of pre-felt of varying degrees of firmess. Then see how differently they felt into a sample piece. I can't explain this, but it might be something of interest in the migration question. In the free tutorial on our blog, showing how to make a simple purse, the decoration is very basic but the colours, even after fulling, remain true. I've used the same decoration technique several times on other items, but the best photo I have to show is this one - even though the piece is fulled, the embellishment colours are bright. You will also be able to see the wrinkles even though overall it looks like a smooth piece of felt! (If you click on the photo you will be able to see it larger.)  |
|