Adding felting cords to the interior of a book resist.
Aug 23, 2020 11:21:21 GMT
MTRuth, lyn, and 3 more like this
Post by Deleted on Aug 23, 2020 11:21:21 GMT
This is my first post to the Forum. Previous posts were in relation to one of Ruth's excellent on-line courses which I undertook earlier this year.
For some reason I am having difficulty uploading the photos from my computer - I can't find the browse option - so for the moment I will create the narrative and then try to figure out what I am doing wrong! please bear with me.
This is a project I undertook in early 2019 and there were a number of trial runs before I settled on making the light. I am constantly inspired by mathematics and architectural construction and the inspiration for this piece came from the internal structure of St. Henry’s Ecumenical Art Chapel in Turku, Finland.

The book resist which unfortunately I can’t find at the moment was quite bulky was made up of four pages (pear shaped – heavy on the bottom) and two of the pages were sewn together so I ended up with seven sides. Merino wool was used and weighed out to ensure even coverage. Embellishments used included silk fibre on the exterior of the piece and also small circular disc resists were included within the felt as I planned to cut craters out of the structure at the fulling stage. This was brought to pre-felt stage.
The length of the cords were important; they had to match and be long enough to run around the sides of the structure. The main body of the cords were made from Finnish Wool (to reflect the origins of the inspiration). I also wanted the cords to break out the top of the structure and I used a combination of colours (Cape Merino) as an addition to the top of the cords. These were brought to pre-felt stage.
The prefelt cords were ‘roughed up’ and carefully hand stitched into the interior of the main structure. This was quite the challenge given the shape of the sides of the book resists. Also it was a bit like putting up a tent – as the more solid cords were inserted the structure started to look more like the finished piece but the whole thing was still very fragile. There were many ‘touch and go’ moments, especially when I released the coloured tops through the holes I had cut in the top of the structure. Also when I needed to make a rather large hole in the bottom of the structure to get the book resist out, so I sewed that back together prior to the next stage. When fully felted the hole was not big enough to put the phone inside to take a photo of the interior! I also removed the discs and felted the craters. I then went on to fully felt the piece. I stiffened the piece (although it probably could have been left alone) with Golden GAC-800.


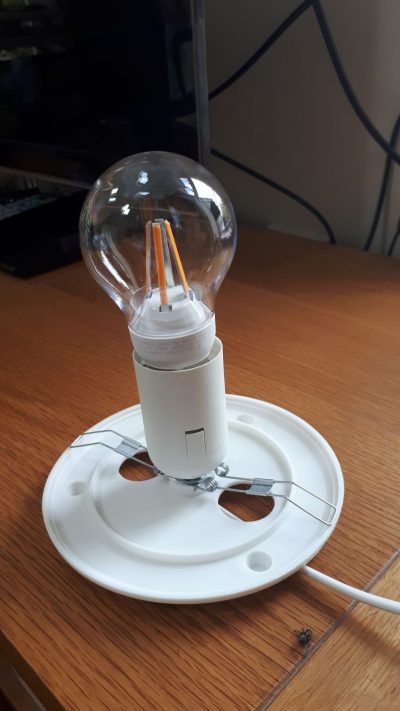
Ikea is such a haven for light fittings. I bought one in the shape of a globe and hacked it purely using the base. Lots of learning curves and challenges but in the end I am very pleased with my lamp.

Addendum: I just can't figure out how to a to attach a photo from my laptop. Just going to stop for the moment as I am heading away for the week. Any assistance with the upload would be greatly appreciated. Many thanks in advance.