|
|
Post by halay on Jan 17, 2014 6:14:49 GMT
I found on the Internet some slippers where obviously two colours of wool were used in two layers, like here in the picture.  and here  I wonder how such a clear cut can be achieved in the pattern? Does anybody know how you should cut out a pattern and when? I assume it must be right at the end when the slipper is completely finished and dried. Also, I like the edges on the other slipper where the two layers are separated. Any ideas how to achieve this? |
|
|
|
Post by zed on Jan 17, 2014 10:43:28 GMT
Most probably with resists, Lyn (or Annie?) has done something similar with vessels, but with nicer edges  Separate the layers with something which won't stick to the wool, like thin plastic from strong carrier bags. |
|
|
|
Post by halay on Jan 17, 2014 12:32:14 GMT
Thanks, Zed, I thought so. I'll wait if Lyn or Annie also respond to my question. In the last pair of slippers which I've recently made I used two different colours of wool and just before I put the slippers into the washing machine I made a slit using small scissors deep enough so that the contrasting colour was seen. However, when I took the slippers out, the slit was almost gone because of additional felting which occured during tumbling in the machine.
|
|
|
|
Post by zed on Jan 23, 2014 10:52:56 GMT
You have to leave the resist in until both layers are felted. This isn't exactly the same, but this is a sampler I made with resist and different kinds of cuts. The underlayer has embellishments so it's not very defined, but you get the idea. You can work the cuts as little or as much as you want. 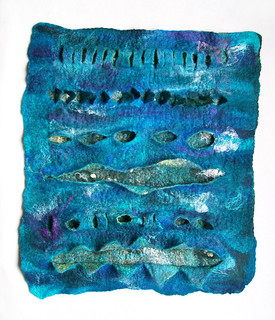 experiment 2 experiment 2 by zedster01, on Flickr |
|
|
|
Post by halay on Jan 23, 2014 12:02:01 GMT
Thanks, Zed. When exactly did you make incisions in this sample? After felting or after fulling? In fact, after my first quite unusuccessful attempt I made another experiment and made a pair of new slippers. There were six layers of wool in total and I put the resits on the fifth layer. I completely finished the slippers and when I took them from the washing machine it was easy to make clean cuts and pull the resist out. Today I was struggling again with my new wool: I used this one from Wollknoll www.wollknoll.eu/shop/wbc.php?sid=383343431f945&tpl=produktliste.html&rid=24 to find out that it felts very quickly (for this reason I had to lay all layers first in two opposite directions then put the resist in the middle, press it down and wet the middle part first, felt it a little and cover (overlap) the rest of the wool on the opposite side. So far I have been wraping wool one layer after another and wetting each, but not with this wool. I found out that this wool does not shrink as I am used too. With all my force I kneaded my slippers, applied several shocks with hot and cold water and somehow managed to fit the slippers on the last. Then they went into the washing machine (40 degrees C). Eventually they shrunk and I won the battle, but it is not the wool I would want to buy again. It is rather spongy. |
|
|
|
Post by Shepherdess on Jan 23, 2014 13:49:11 GMT
Halay it is important to do a test piece with new wool to see how it felts. Spongy wool is good for making insoles.
|
|
|
|
Post by Pandagirl on Jan 23, 2014 16:10:17 GMT
Halay, I'm looking forward to seeing your results. You always choose such ambitious projects. :-) Are you selling all this work?
|
|
|
|
Post by lyn on Jan 23, 2014 17:23:39 GMT
This youtube tutorial may help: tutorialUsing resists is how I would get separate layers - I cut up some 'punched pockets' to make resists for layering as the plastic on those is very thin but stiff enough to place (well, the cheap ones I buy are made from very thin plastic!) This photo shows the first resist being placed (it was a multi-layer pod) and the pink wool is a marker - handy tip when you're turning work over and over if you mark the centre of the cut-out after each new layer then you won't get confused. Attachments:
|
|
|
|
Post by halay on Jan 23, 2014 18:45:11 GMT
Lyn, thank you for your advice. Sorry to bother you, I don't understand the word "punched pocket" and the link which should lead me Youtube brought me to a Russian site where indeed are some photos but no real tutorial.
|
|
|
|
Post by lyn on Jan 23, 2014 19:19:03 GMT
Hello Halay - this is a punched pocket photo from Wiki: punched pocketI had hoped the photos would help on the Russian site, sorry. If you don't want to use resists: When making anything in layers of different colours, if you 'work' each layer a little before adding the next, even though all the layers will felt together, you can still get separation i.e. using sharp fine-pointed scissors you can cut away layer by layer. If you do this when the item is almost fulled, you should keep the shapes you want but get a softening and smoothing of the edges. I would complete the whole thing by hand and not use a washing machine or tumble drier because I like to keep control. |
|
|
|
Post by koffipot on Jan 23, 2014 20:14:58 GMT
I use a marker to show where the resists are, I also use a fairly stiff plastic so I can feel it. This is a bag I made with several resists:- One for the bag itself, another for the inner pocket and three more for the 'seed pods'. I used some Ikea shelf liner - the type with little bobbles on one side. www.flickr.com/photos/koffipot/6376550963/I also placed silk hankies either side of the resist to give another texture as well as colour. Then cut a small slit and rubbed the edges to smooth them. Any cuts made tend to make a larger hole than you start out with, so don't cut too much at first. I too tend to full by hand rather than in the washing machine, as you can lose control of the process!  I did this with my first pair of slippers and they ended up fitting my then 4 year old grandaughter!! I have small feet, but not that small!! She was delighted with them so nothing lost. |
|
|
|
Post by Pandagirl on Jan 24, 2014 0:36:42 GMT
Great info ladies. Another few things to add to my things to do list. :-)
|
|
|
|
Post by zed on Jan 24, 2014 11:20:32 GMT
I probably did those cuts/removed the resists when it was felted and half fulled, then finished off fulling and shaping the cuts.
I can't tell what that wool is that you used, halay.
|
|
|
|
Post by halay on Jan 25, 2014 8:16:58 GMT
Koffipot, thanks for good instructions. I've seen your handbag before and admired it an just wondering how you can make something like this. Now I know, thaks again. I'll definitely try this in the future.
|
|


 I did this with my first pair of slippers and they ended up fitting my then 4 year old grandaughter!! I have small feet, but not that small!! She was delighted with them so nothing lost.