|
|
Post by dottyhen on Apr 12, 2016 18:40:54 GMT
Hi, I've got a shawl that I made some time ago, using cotton scrim and a single layer of wool fibres. I have been toying with the idea of cutting armholes in it to form a vest/ waistcoat and have spent ages using bits from an old sheet to work out where to cut the armholes (a useful exercise as it looks as though the holes work better if slightly slanted). What are people's thoughts about sealing/ finishing the armhole edges? Or will it not be necessary? I don't have any sample bits to try it out with. I then wondered about making a new one from scratch, but working out where the holes would be accounting for shrinkage is just too much for me! Any advice greatly appreciated!
Jane |
|
|
|
Post by jwugg on Apr 12, 2016 20:23:48 GMT
I think I'd wet & soap & rub the holes a little, to seal the edges. I have often seen 'patterns' for rectangular pieces of fabric with armholes, look on Pinterest if you use it. Or measure across your back to find the spacing. You get a sort of waterfall front edge, I did make one once but wasn't happy with the shaping.
Please show us a photo when you are successful.
|
|
|
|
Post by Shepherdess on Apr 12, 2016 20:35:29 GMT
I agree wet and rub the edges and/or roll them slightly.
|
|
|
|
Post by Pandagirl on Apr 12, 2016 20:57:46 GMT
If you have a vest that fits you, I'd try using that as a pattern for the armholes. I agree with the rubbing to heal the edges.
|
|
|
|
Post by MTRuth on Apr 12, 2016 21:36:14 GMT
We did have another discussion about this. I think Frances made one if I remember. She might have some advice for you.
|
|
|
|
Post by dottyhen on Apr 14, 2016 9:14:05 GMT
Thanks for your suggestions. I'll have a go at cutting holes and sealing the edges. Wish me luck!
|
|
|
|
Post by Frances on Apr 14, 2016 21:46:36 GMT
I tried making one and it did not work out - was too small - This is where I got the idea from but had no instructions regarding dimensions  |
|
|
|
Post by Pandagirl on Apr 14, 2016 21:58:09 GMT
Sorry to hear that Frances. You're brave to try something without instructions. Was there a specific size stated or did you just wing it? What was the material?
|
|
|
|
Post by Frances on Apr 15, 2016 0:40:15 GMT
Sorry to hear that Frances. You're brave to try something without instructions. Was there a specific size stated or did you just wing it? What was the material? I just winged it and I thought I was using good quality merino but it got all bumpy and thick and shrunk like 50 to 60 percent. I tossed it in the trash. |
|
|
|
Post by Pandagirl on Apr 15, 2016 0:52:09 GMT
Well, sometimes there are good accidents and then there are bad experiences. I hope your next project works better for you. I think we've all had a trash can project. Hang in there and don't let it discourage you from trying something else.
|
|
|
|
Post by Shepherdess on Apr 15, 2016 2:29:11 GMT
I have transformed a shawl I measured across the shoulders and added a little for ease. If the was enough wool I just wet and sealed them . If not I added wool around the slit and felted it. I made my slits so that if I wore it one way up it had a small collar and the other way up it had a big shawl collar. I once did small wool oval one starting with the intention of it being a vest/shrug/bolo. I cut the arm hole slits when it was almost done. I will try and find a picture on the back up drive. It was a few years ago.
|
|
|
|
Post by sundownalpacas on Apr 19, 2016 1:46:01 GMT
I tried making one and it did not work out - was too small - This is where I got the idea from but had no instructions regarding dimensions That is the one that I shared on FB. I could have given you dimensions. That pattern is a simple knitted vest. I did not have any to go by either. I just winged it, but that is from my sewing days and sewing many vests. I also now how much my alpaca will shrink. Sorry that it did not work out for you. Attachments:
|
|
|
|
Post by dottyhen on May 14, 2016 18:50:09 GMT
Well, I am finally able to share my attempts to turn a scarf into a vest! It turned out that sealing the edges was really easy. I turned a small amount over to the wrong side and rubbed to seal them. As the scarf was not fully fulled, it worked like a dream. I had found out from experimenting with old sheets, that it worked best if the armholes were on a slant. But the holes elongated like crazy!
Despite this I was fairly pleased with it, until my other half saw me try it on and said "what is that shapeless thing?" He is not exactly known for his tact or love of felted items! I put it aside in disgust until today when I had another go, putting it on my mannequin (which was wrapped in cling film) and rubbing at the armholes again. I think it is better, but still by no means perfect. IF I did it again I would cut shorter armholes. I think it looks best when wrapped fully across the front rather than left with the waterfall front, and I like the feel of wool combined with scrim. As a result, I think my next project will be to attempt a tunic, when I find time to take the measurements and make a template!
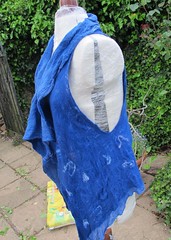 blue vest side by Dotty Hen, on Flickr blue vest side by Dotty Hen, on Flickr
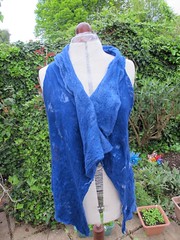 blue vest front by Dotty Hen, on Flickr blue vest front by Dotty Hen, on Flickr
 blue vest wrapped by Dotty Hen, on Flickr blue vest wrapped by Dotty Hen, on Flickr
|
|
|
|
Post by lyn on May 14, 2016 20:28:21 GMT
Don't listen to him! It's very pretty and I agree the wrapped vest is best on the mannequin but on a person the waterfall front version could look good over the right undershirt.
|
|
|
|
Post by Pandagirl on May 14, 2016 22:51:44 GMT
It's beautiful Jane! Lyn's right, don't listen to him. I love the waterfall front! Thanks for sharing it with us!
|
|


