|
|
Post by MTRuth on Jan 5, 2015 1:01:58 GMT
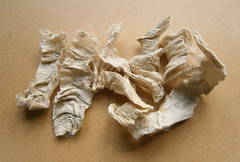
I made a felted piece with silk carrier rods but can't seem to find the photo at the moment. I machine stitched the felt background and then attached the carrier rods by hand stitching to form an organic shape that looked sort of tree/branch like. Those were the tubular kind. The easiest way to use them in felting is to soak them and separate the layers. Then when you have them thin enough they will felt in like any other silk item.
|
|
|
|
Post by Frances on Jan 5, 2015 1:07:30 GMT
following
|
|
|
|
Post by MTRuth on Jan 5, 2015 2:02:02 GMT
 I found the photo with the carrier rods. |
|
|
|
Post by Pandagirl on Jan 5, 2015 3:43:25 GMT
How did you use your silk cocoons Marilyn? The only place I have seen them used was on Fiona's SDO course. If you look closely at the Pollack pics you may be able to see them. I just included them for texture placing a little wool to anchor them. You could also use them as an inclusion and open it like you would a gem. |
|
|
|
Post by zed on Jan 5, 2015 10:01:22 GMT
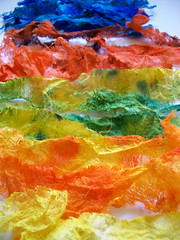
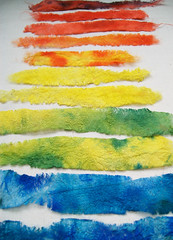
I remember that piece, Ruth, it's gorgeous  Teri, yes the pieces are separated layers. The rods start like the tubes, it's waste that gathers on the end of something, can't remember what off hand, they are slid off as the tubes, or cut off. I suppose it depends how long they are left as to how thick etc. The whole or slit tubes are more expensive than the crumpled flattened layers that don't smell too nice |
|
|
|
Post by koffipot on Jan 5, 2015 17:10:51 GMT
Thanks for sharing that pic Ruth, it's really lovely. These tubular rods are so lovely it seems a waste to strip them down and I'm sure I'll find a purpose for them one day.
|
|
Deleted
Deleted Member
Posts: 0
|
Post by Deleted on Jan 5, 2015 20:33:56 GMT
Hello Ruth, your silk Rod Art is very pretty ..
So Zed, your silk Rod Art in the bold bright colors are soaked in water then split open and then flatten and left open to dry???
|
|
|
|
Post by zed on Jan 5, 2015 22:51:40 GMT
|
|
|
|
Post by MTRuth on Jan 5, 2015 23:47:41 GMT
They really do take the dye so nicely and give really nice bright accents. Thanks for showing the photos Zed.
|
|
Deleted
Deleted Member
Posts: 0
|
Post by Deleted on Jan 6, 2015 0:48:47 GMT
Zed. The photos are great and explains the process beautifully. Thanks for sharing.. The dyed rods are bright and gorgeous..
|
|
|
|
Post by jwugg on Jan 6, 2015 7:26:20 GMT
So now we know, that makes sense! Thanks Zed
|
|
|
|
Post by zed on Jan 6, 2015 10:39:25 GMT
You're welcome Though I'm fairly certain it was Ruth and Ann who told me what to do with them back then |
|
|
|
Post by luvswool and dyestuff on Jan 6, 2015 13:38:31 GMT
Enjoyed seeing the process of dyeing silk carrier rods. Thanks for sharing, Zed!
|
|
|
|
Post by penguin on Aug 26, 2015 13:09:24 GMT
If you soak the tubular ones you can do something very similar to what Zed did - split them into layers, flatten them, dye them etc. I've used pre-dyed tubular ones and done that, and you just get less and less dye as the layers go down, which can produce a nice graduated effect. Can't provide a photo because a) I'm about 250 miles from home and b) I've done so much overlay and stuff on the rods that unfortunately you can barely see them. (Something else that's ended up in the sample pile waiting for more inspiration!)
|
|
|
|
Post by carole aka craftywoman on Aug 27, 2015 7:47:34 GMT
I dyed mine too, it was like christmas opening them up the colours were divine   |
|